When cords are everywhere, especially towards the back of your desk, it is usually bothersome. Even if you first arrange and order them well, they ultimately become twisted and the whole thing turns into a mess.
Having a cable management organizer would be a simple way to keep things organized. There are many projects that may provide you with helpful advice and ideas if you are unable to buy one in stores or just want to create one yourself.
How To Hide An Extension Lead
Extension leads are not the most attractive objects, despite their convenience. With a homemade cable organizer, you can have the advantages of an extension lead without the clutter. All you need is a nice cardboard storage box, some cutting-edge scissors, and an extension lead-sized space.
Cut a large slit in the middle of each end, then insert your extension lead. Once your cables are fed through both ends, you have a smart solution to keep all those wires organized.
DIY Rubber Bones
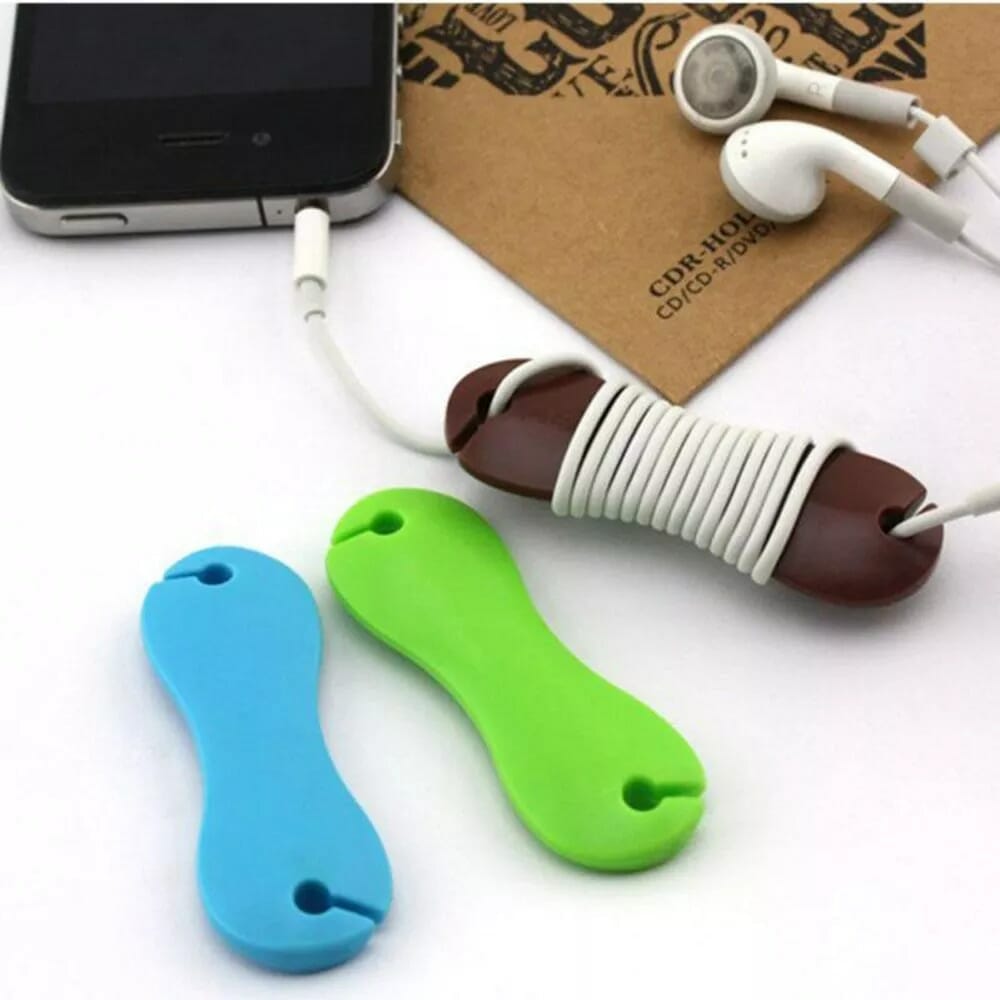
If you have long cords hanging around your standing desk and are unable to put them somewhere else, this is a fun and simple DIY under desk cable management solution. Rubber, cardboard, or really any material sturdy enough to hold everything in place can be used.
Simply cut two pieces of bone form about 4 inches long, give them holes at either end, and cut a little slit across the middle. The cables can now be inserted and snugly wrapped around the bone. Then, you can either leave it sitting on your desk or carefully tuck it beneath your computer.
Using Toilet Paper Rolls
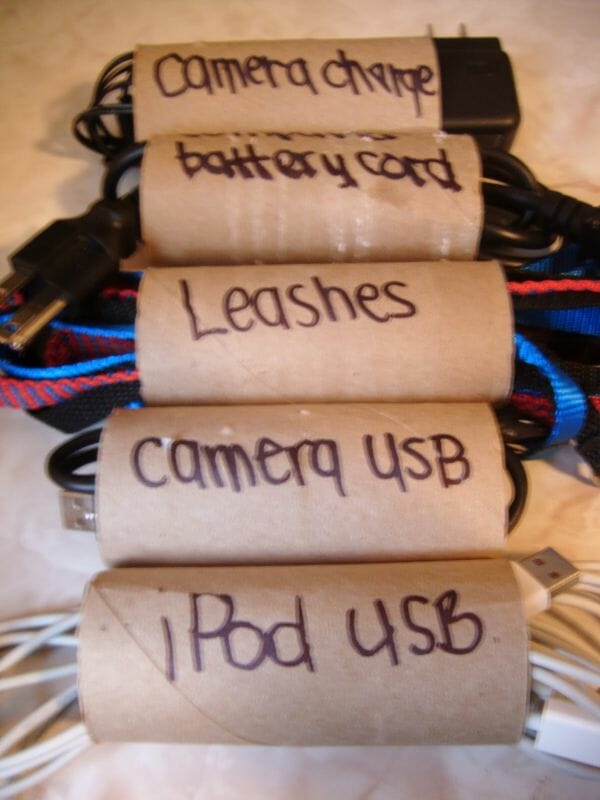
It need not be challenging or complex to keep your cords tidy. You may utilize a variety of quite straightforward options. Rolls of toilet paper are one option. Toilet paper rolls are excellent for this, despite the initial absurdity of the idea. You may identify your cables to save space and effort by simply writing the type of cable it includes on each one.
How To Keep Your Wires Tidy
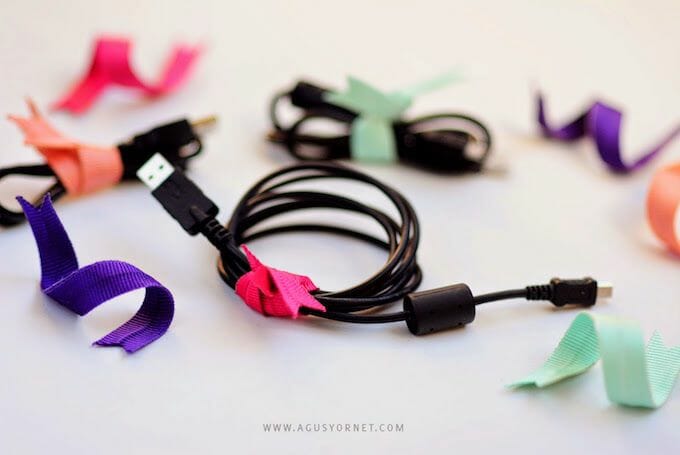
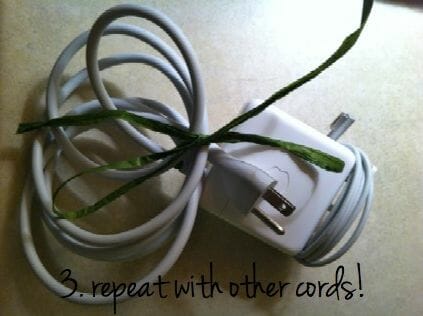
We offer the ideal solution if all you need is to tidy up your cords rather than organize things. If wires are left to their own devices, they will unravel everywhere, tangling and twisting as they go. Agustina came up with the quickest and prettiest solution ever: make your own cable ties out of ribbon and wire. They’ll keep your wires neat and organized so you won’t have to waste time untangling them.
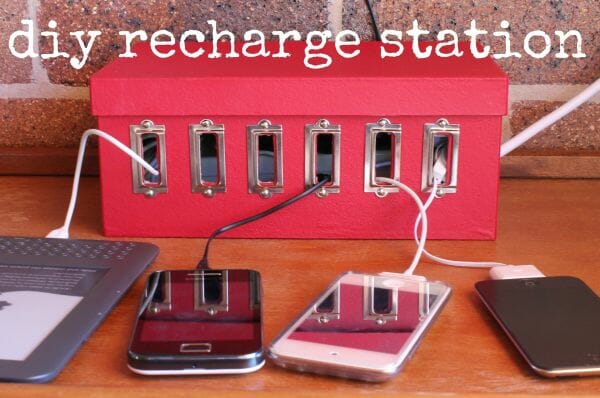
DIY Charging Station
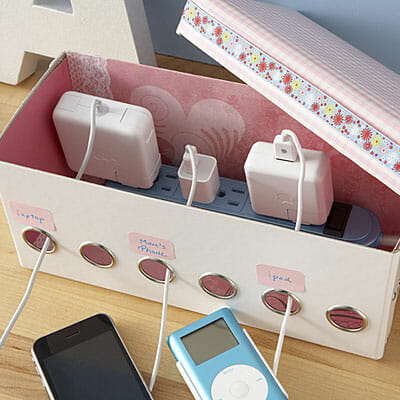
To make it seem as amazing as you want, you’ll need a shoebox and all your arts and crafts supplies. To begin with, make a hole at the end of the box where the power strip’s cord will exit when it is inside. Afterward, drill as many holes as there are outlets on the power strip.
After that, you can start customizing your box as you choose; it could even be enjoyable to work on with your kids. However, you may easily purchase self-adhesive paper in your preferred design and adhere it to the box if you want to preserve a minimalist appearance.
By attaching some metal edges to the holes, you may further shield the wires from chafing. This can also give it a lot more polished appearance.
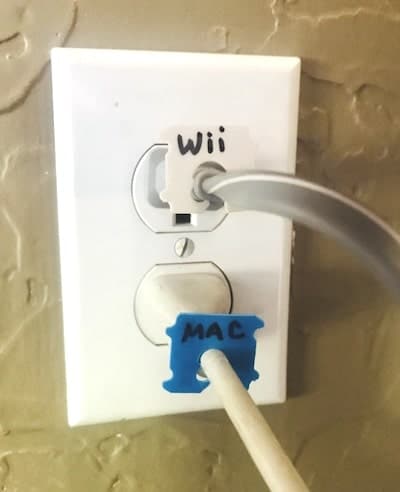
Label Cords
Can’t seem to keep track of which wire is which? Use tags to identify each wire to prevent mishaps like disconnecting your computer accidentally because you choose the wrong one. Use various colors and name each one so you can always tell which is which.
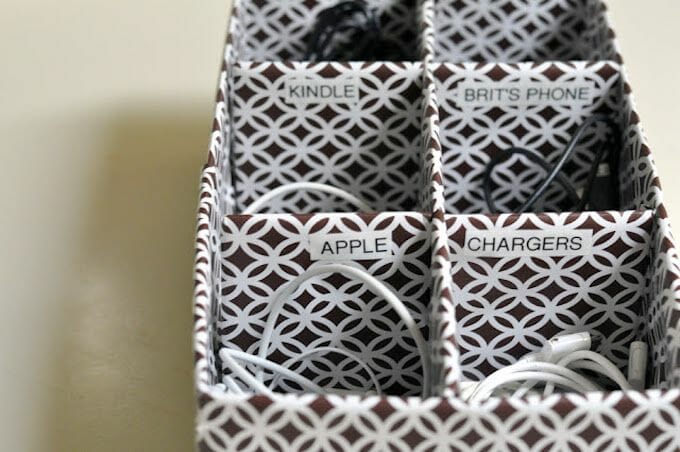
DIY Cable Tidy
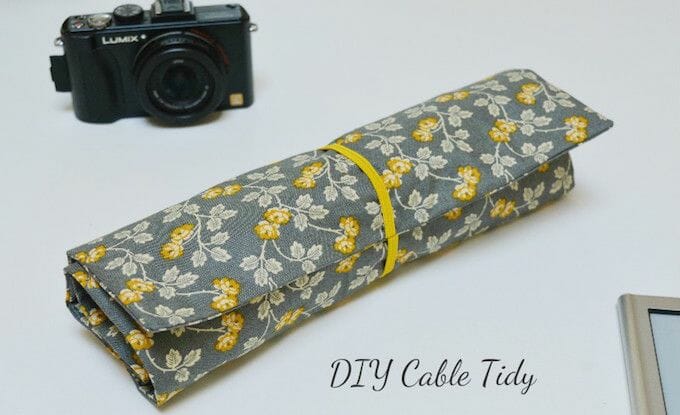
If you require portable cable storage, have a look at this. The Fabric Cable Tidy from Vicky Myers Creations is an excellent solution to organize and maintain the cleanliness of phone, camera, and tablet chargers.
This is a sweet little craft that just requires very basic sewing abilities. This is the perfect DIY wire organizer if you’re looking for something attractive and portable for trips and the like.
Velcro
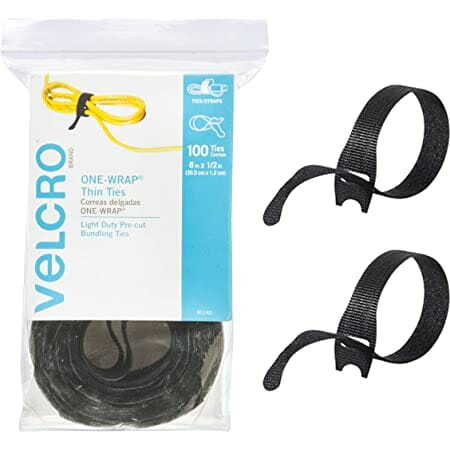
Here is another another DIY desk wire management concept. Finding some useful Velcro and utilizing it to assemble everything and attach your connections to your desk will make organizing your cables a breeze. If you wish to fasten them to your table, you might also want some screws or strong glue.
However, because they are affordable and simple to relocate whenever you need to, they are one of the most adaptable and well-known alternatives you have.
Raffia Ribbon
You must always bring your chargers when you travel. Most likely, you pack them all in a bag, only to discover when you get there that they were intertwined. But here’s a really easy and adorable method of keeping them arranged. To organize all the cords, use raffia ribbons. In the event that you also carry someone else’s, they’ll also make it easier for you to tell them apart and you’ll always know which ones are yours.
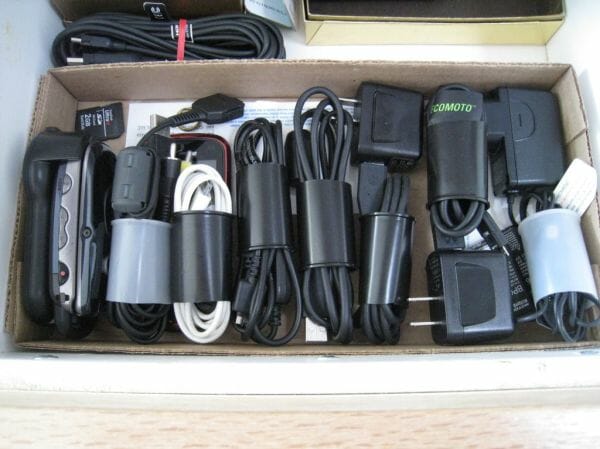
The Cheapest DIY Cable Organiser Ever
With her DIY cable organizer constructed from a cheap shoe box and some cardboard, Darkroom & Dearly proves that organizing your cords doesn’t have to be difficult.
For both large and small chargers and cords, this straightforward fix works well. What more could you want for than something that is attractive, useful, and inexpensive?
Colorful Thread
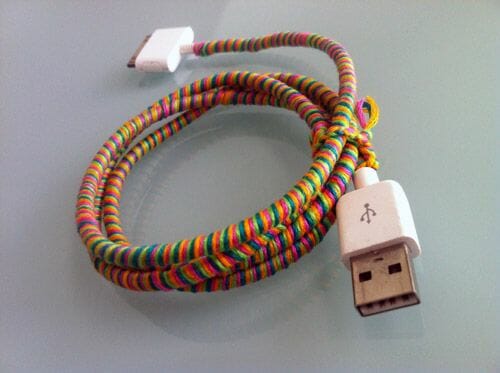
If you thought Velcro ties were fantastic, you could be surprised by this alternative since it offers all the same advantages as Velcro while also adding a dash of color.
Simply gather your cords together securely using your preferred colored threads. Each cable could even be color-coded to make finding and replacing them later on easier.
Plug Hub Desk
For all the cords that need to be hidden and managed, the Plug Hub is the ideal option. All the cords and the power strip are kept inside this cord management station that fits under the desk. Three cord anchors are within, and there are three apertures on the top. It is composed of solid plastic, and the bottom has a rubber foot.
Binder Clips
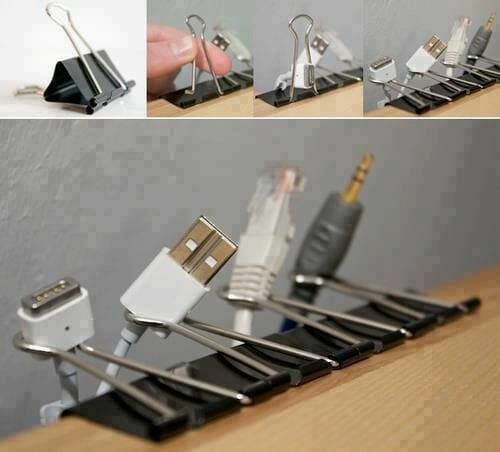
You might adore these homemade cable clips. Imagine you’re at a business meeting using your phone when you discover it is down to one percent power. You begin to anxiously search your desk’s messy mess for your charger, but no matter where you look, you are unable to locate it. Unavoidably, you miss certain important meeting locations and get isolated.
By using your binder DIY cable clips again, you won’t ever allow this happen to you. To ensure that you never again misplace your phone, hang them on the edges of your desk and place your cords on their hanger area.
For better space management, you can also label the DIY cable clips with the names of each cable and charger.
Decide How Many Cables and Cords You Really Need
Really, how many wires and cords are required? Wonderful query. According to CNET, some cable types are better off being thrown away than others.
Keep any cords that are compatible with the devices you now use, for instance. Additionally, it’s OK to keep one mini-USB cable around in case you come upon an old hard drive or camera that requires one.
Color Coded Cable Ties and Labels
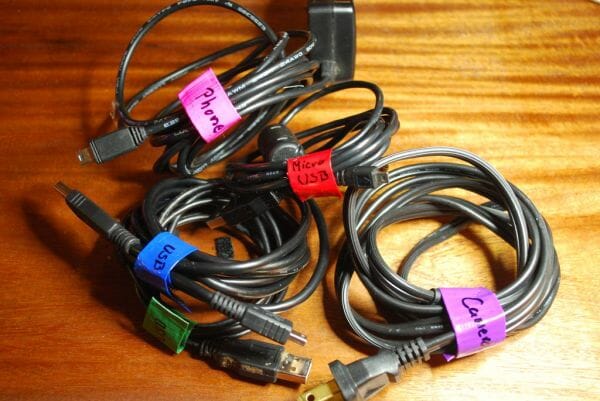
Use cable ties and labeling as another simple tip to keep all the wires organized. To quickly identify your wires and chargers, use duct tape in various colors. Also required are Velcro and a hole punch. Everyone should have it in their home since it is simple.
Power Bar
Given that your minimalist desk layout usually already includes a power bar, this is an easy and affordable DIY alternative for managing desk cables. Choosing a location for it is now the main challenge. Given how large it is, leaving it laying on your desk may result in a major mess.
As a result, a clever trick is to attach it to the underside of your tabletop. This will allow all of your wires to congregate in one location, and you can then secure everything with tape. All of your cables are instantly forgotten about and out of sight.
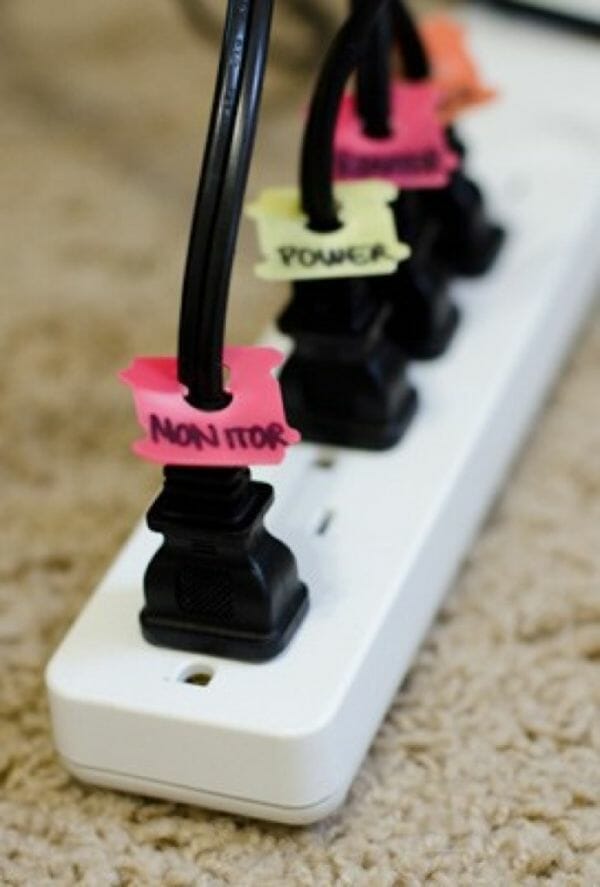
Label Cables At The Outlet
Here’s another advice that works well in my home. By naming your cables and cords in this way, you may save a ton of time if you have many cables and cords hooked into one outlet or surge protector.
I used bread bag clips that I had lying around for my cables, however they are prone to breaking. If you want to attempt this method, Amazon provides a broad selection of cable labels for devices. The most crucial element is that you won’t ever disconnect the incorrect appliance or equipment again!
Earphone Cord Keepers with Printable Packagin

Here is a suggestion for a festive and practical present you may create for someone. It’s a gingerbread man-shaped earbud cord catcher. Polymer clay, miniature cookie cutters, a bamboo stick, a cutter, and sandpaper are required to build it. Any form that you like is an option.
This is only an illustration. The clay should be worked and flattened before being cut into the appropriate form. You may use anything else to mimic the texture of the image you have chosen, or you can use the sandpaper to create the texture of a gingerbread man. Make the necessary additions, and then drill the cable hole.
Use Cable Clips to Attach Cables to Surfaces
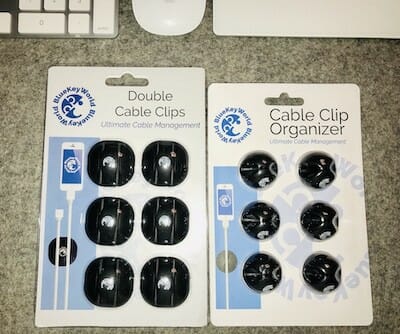
Blue Key World sent me these cable clip organizers to test out and review. Both the single clip and double clip versions are offered on Amazon. These each come in a bundle of six.
Simply peel off the backside of the clips before sticking them to a flat surface to use them. Simple, peasy! To keep the cord for my phone charging in place, I initially tried one on my nightstand.
Charging Station
This DIY charging station is incredibly practical and simple to construct. You’ll also need a cardboard storage box, some paint, a pencil, a ruler, some little brads, a craft knife, something to punch holes in, and a power board. Mark the space within as well as where you want the book plates to go.
The rectangles should be cut, and holes should be punched for the brads. Additionally, make a hole for the power board cord. You’re done after adding a coat of paint.
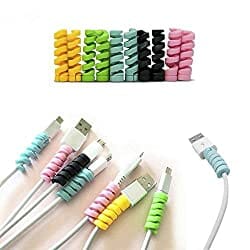
Tidy Messy Cords With Cable Sleeves
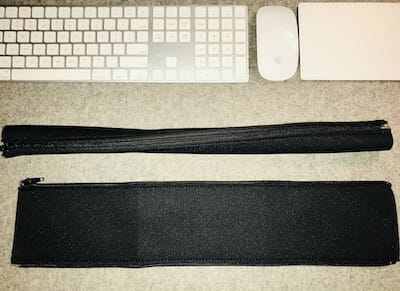
A smart approach to organize all the cords behind the desk or TV is using cable sleeves. I personally find it disgusting how tangled up unsecured connections appear.
I received a set of four cable sleeves from Blue Key World (sold on Amazon) to test out and write a review on. Here is how they seem when they are first opened.
Hanging Cord Organizer
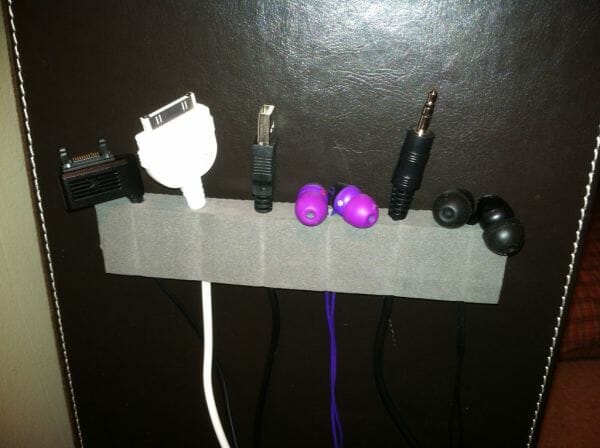
The wires, earplugs, and chargers typically wind up in a drawer where they become tangled. It’s not always simple to keep them organized, even when you try. For all of these products, though, here’s how to construct a pretty straightforward cable organizer. Both foam rubber and Velcro or double-sided tape are required. To attach your charger, earbuds, USB cords, and other wires to a wall or your desk, you should drill multiple holes in the appropriate places.
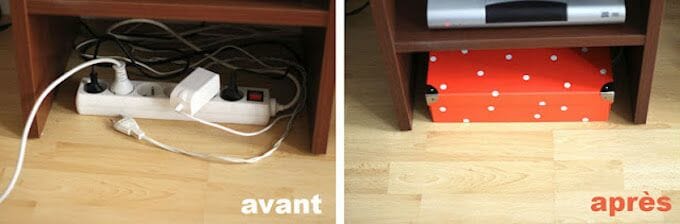
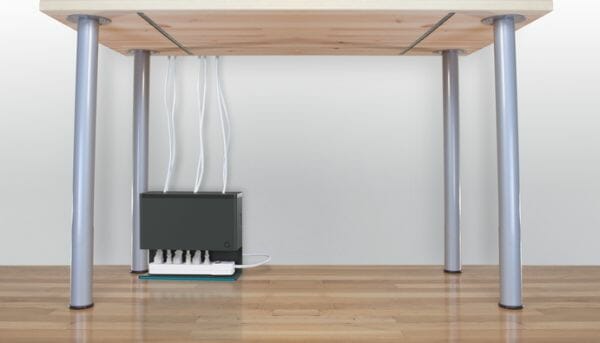
Hide Power Strips in an Under-Desk Cable Storage Tray
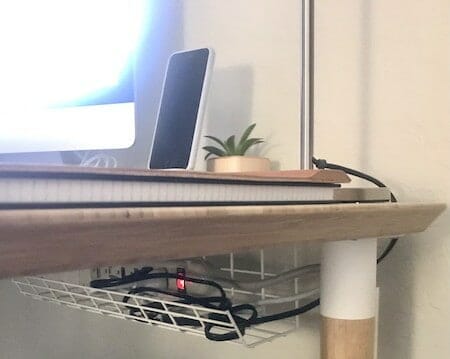
My preferred option for stand-up desks and tables is definitely this one. It may be quite difficult to conceal wires that run from the desktop to a power strip on the floor if you like workstations with simple, minimalist designs. Install a storage tray underneath the desk as the answer, and keep the power strip(s) there. That looks wonderful, doesn’t it? Using the peel and stick cable clips, you may also run the power strip wires around the back of a desk or table leg.
Cord Minder
Do you recall the old film canisters? There might be some left in your house. You presumably believed that since we no longer utilize films, they were no longer useful. Well, reconsider. You’ll need them for these cord organizers, so go grab some of those containers. Cut around the container’s bottom first after taking off the lids. The remainder may be used to arrange the wires in your drawer once you remove the bottom.
Is There a Wrong Way to Tie Cords and Cables?
The quick response is “yes”! Any technique that kinks the cable or applies excessive pressure to the area where it attaches to a socket or power brick will harm it.
(If you’ve ever seen exposed wires with a damaged cable sleeve, you understand what I’m talking about.) Useful cable guards like these CAN prevent your charging cords from bending and breaking at the plug connector.
Cord Rack
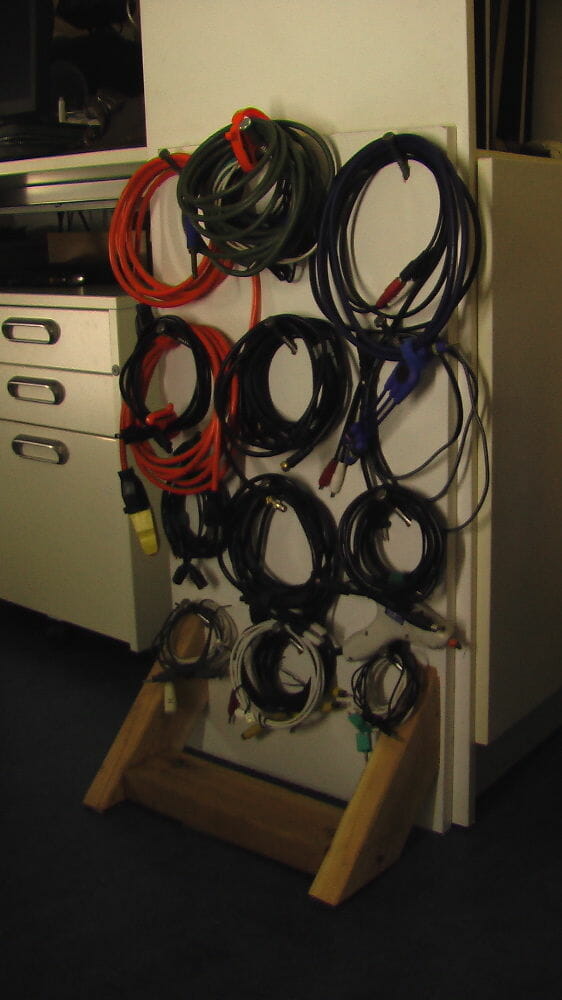
Another excellent idea is a cable rack. You must first determine the width of the board you intend to utilize. Mark its center after locating it. Using the T-square, add two marks on either side and move them downward. Bolts are added once the holes are made. It will enable you to keep your cords neatly and out of the way.
