Halloween is quickly approaching. If you still haven’t had a chance to decorate your pumpkins, you should do it right now. In addition, the whole family may participate in this entertaining pastime, even your kids.
However, we are aware of how difficult it can be to locate the next top technique for painting pumpkins, particularly when you have previously worked with so many different Halloween themes in the past.
We are here to assist you in moving in the correct way, so don’t be alarmed. The 50 finest pumpkin painting tutorials you should try out this year are on our list of the results of our exhaustive study. Most of them entail painting, while some call for carving. We are certain that you and your family can discover the solution that works best for you.
Twirl for Swirls
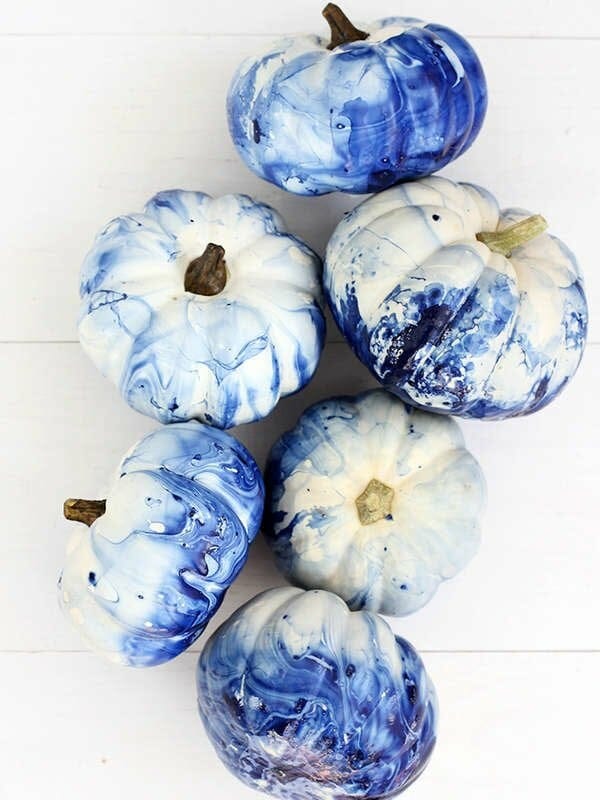
It’s not too difficult to recreate this nice blue marble appearance. Just some water, nail paint, and a bowl to dip the pumpkin in are required. The entire instructions for making this indigo fantasy are available at Alice & Lois.
Glitter Glam Painted Pumpkins
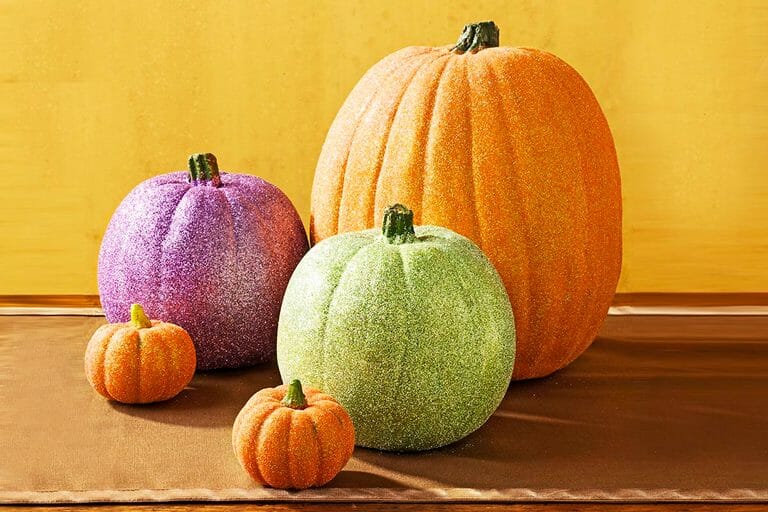
Use a sponge brush to apply a small coating of decoupage adhesive to your pumpkin for a glittering pumpkin painting idea. Glitter should be applied to the pumpkin before the glue dries. (If your pumpkin is really big, divide it into smaller pieces.) Any extra glitter should be shaken or blown away. Before contacting, let the adhesive entirely cure.
Goofy Faces Cute Painting Ideas
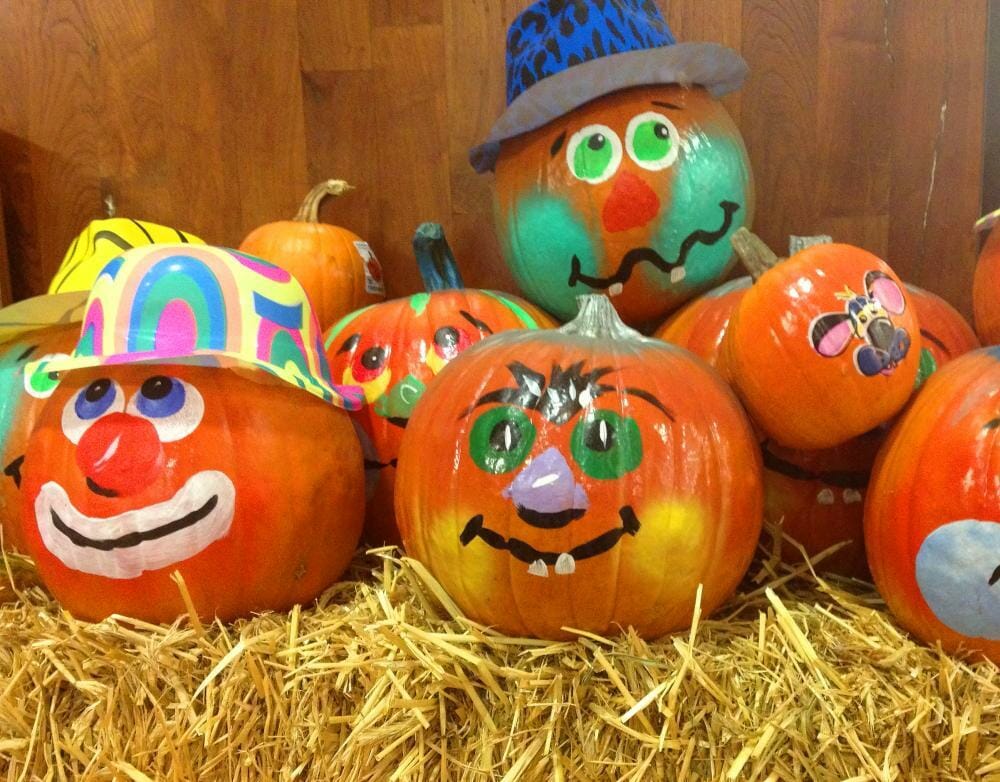
Make sure not to miss out on this bright pumpkin idea since kids require a lot of color in their Halloween party theme. Regular pumpkins have funny faces painted on them, giving them the appearance of rural clowns. You may even invite your entire family to participate.
To do this and make the drawings as vibrant as possible, as you can imagine, you need a variety of paint colors. You should also make multiple pumpkins in this manner, each in the wildest manner imaginable.
Clowns with crimson noses, grins, flushed cheeks, and multicolored eyes can be seen in the image above. And to top it off, if you want to be extra imaginative, you may add outrageous hats.
Orange Ombre
This seemingly straightforward color combination requires little work, but it’s well worth it! Choose a color scheme inspired by Halloween, like Sarah Hearts did, or go with a color scheme that complements your interior design.
Black and White Marbled Pumpkins
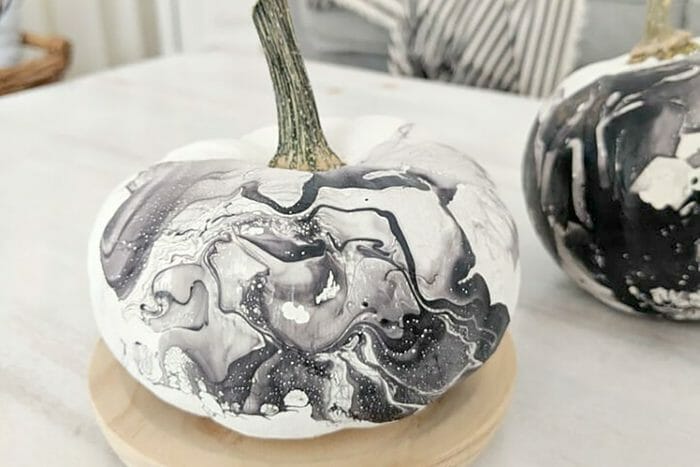
We adore pumpkin painting ideas that employ common household objects and let you get inventive with inexpensive Halloween ideas, like this guide by Katrin Fedeler of Northern Feeling for a chic pair of black and white marbled pumpkins. What are the essential components to this lovely marbling pattern? A skewer for making kebabs, some furniture wax, and black nail paint!
Lacking much time to devote to your DIY projects? In order to avoid having to paint the entire gourd white and wait for it to cure, Katrin advises using white pumpkins rather than orange ones.
Creative Halloween Painting Ideas for Pumpkins
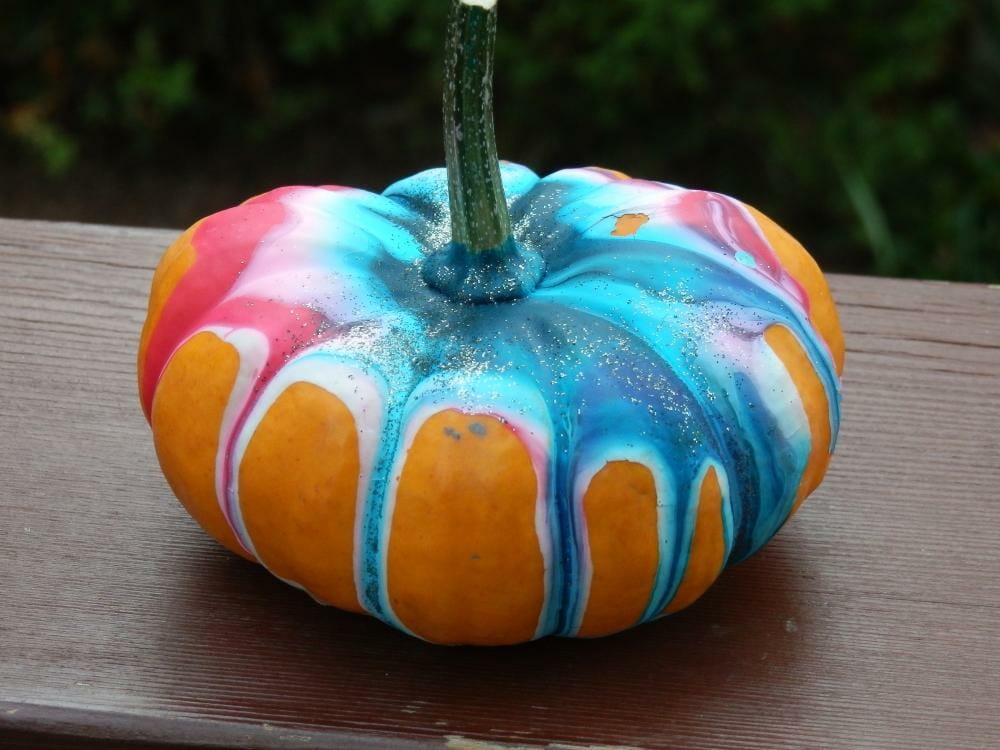
Check out this inventive painting technique for pumpkins, which requires no cutting, if you want to approach Halloween artistically. You only need some paint.
This beautiful look may be achieved by painting a single pumpkin with several distinct color treatments. The secret is to let the paint drip on the sides and then wait until it is dry before adding another color.
If the entire creative process seems too haphazard to you, you may use a paintbrush to define the drips. Don’t forget to finish the design off with glitter. Make careful you use various color combinations to adorn numerous pumpkins in this manner. We know your visitors and trick-or-treaters will adore it.
A Galaxy Far, Far Away
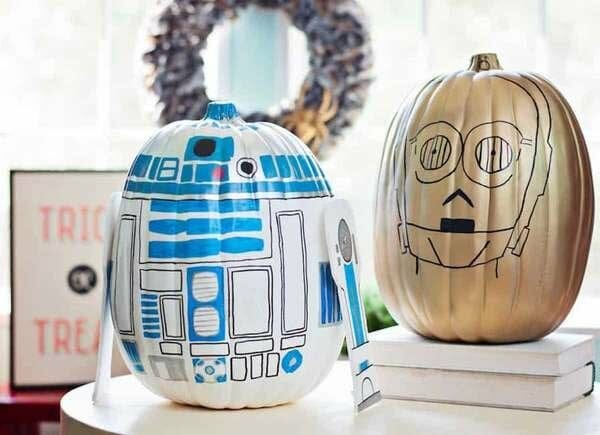
You must create these if your home like Star Wars! DIY Candy built her own versions of R2-D2 and C-3PO after getting inspiration from some of the droids from the Star Wars film series. You may also have these men sitting on your front steps with some spray paint, markers, and tender affection.
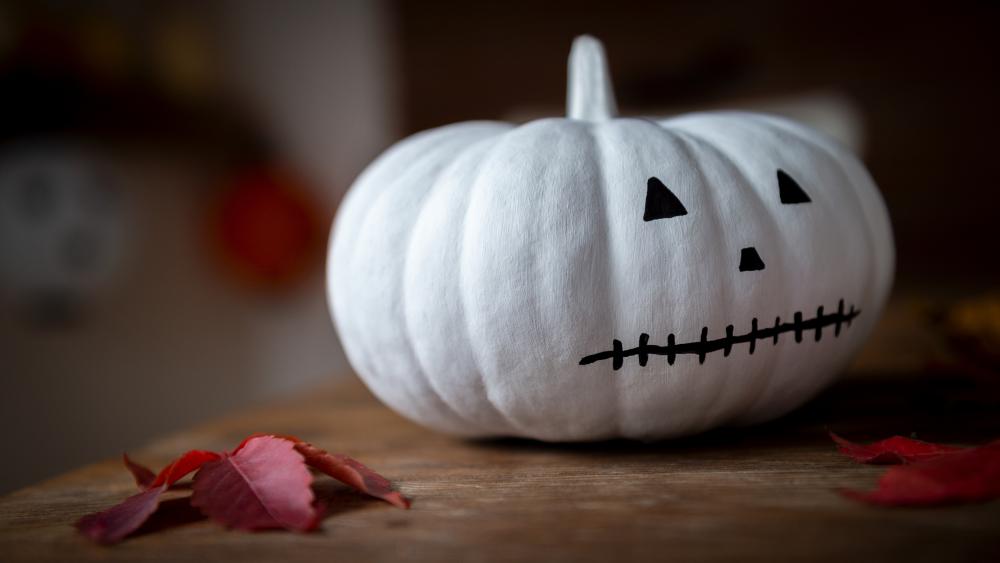
Jack Skellington Pumpkin
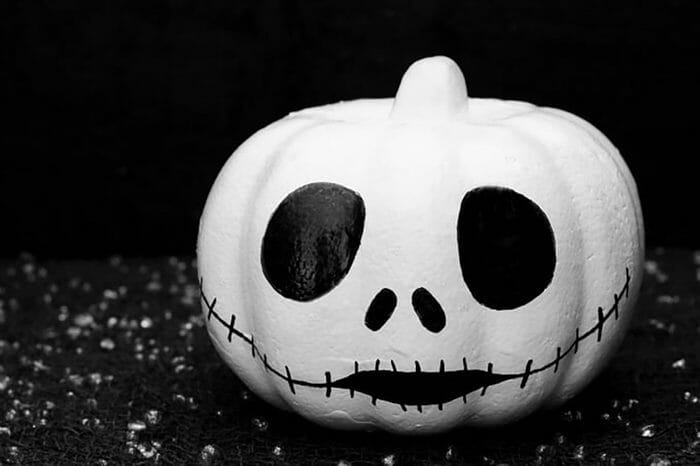
You only need a black Sharpie and a bottle of white acrylic paint to replicate Fun Money Mom’s kid-friendly Jack Skellington pumpkin painting concept. Blogger Lisa O’Driscoll provides step-by-step images and directions for creating the perfect Sally Skellington pumpkin, as well as how to create the character’s eyes, nose, and mouth.
Easy Pumpkin Painting Ideas
This charming and simple pumpkin painting concept takes very little work from you. As you don’t need to use a lot of paint, the design is minimalist. You only need a Sharpie pen; you don’t even need paint.
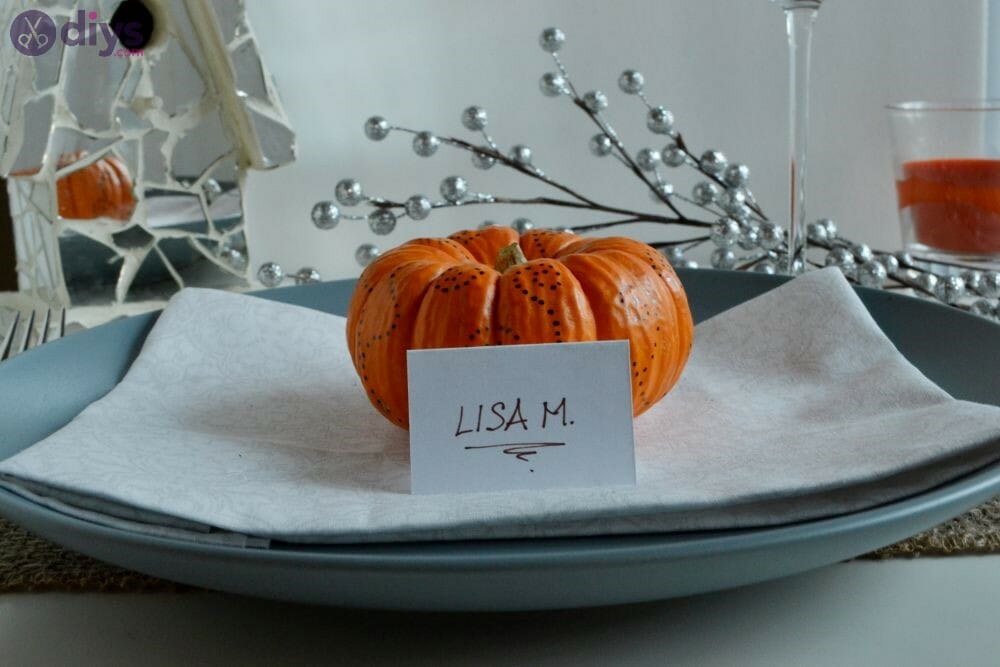
Collect a few white or orange small pumpkins, then use the Sharpie marker to make some dots on them. Check out the designs shown in our simple tutorial if you need some inspiration. You can, of course, deviate from the guidelines and produce whatever style you choose.
Let’s say you think the style is too monochrome. In that scenario, you may paint the miniature pumpkins in any color before painting on them or use Sharpie markers in a variety of colors. Just be careful to cover the area with plastic to protect it from paint. Additionally, wait until the paint is totally dry before adding a second layer.
You may also write amusing phrases like Happy Halloween or Trick or Treat in addition to dots. And since it’s simple enough, you may invite your kids to participate. Since no special materials need to be purchased, it’s a great last-minute trick for adorning Halloween pumpkins.
Make a Statement
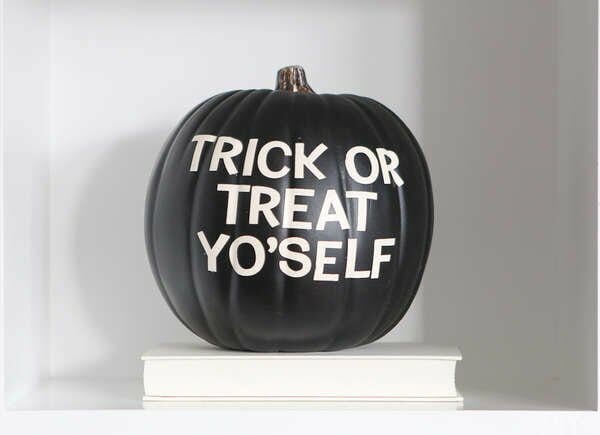
Casey and Bridget at DIY Playbook created their own version of the famous letter board craze using a pumpkin! With some black spray paint and alphabet stickers, create your own statement.
Patterned Pumpkins
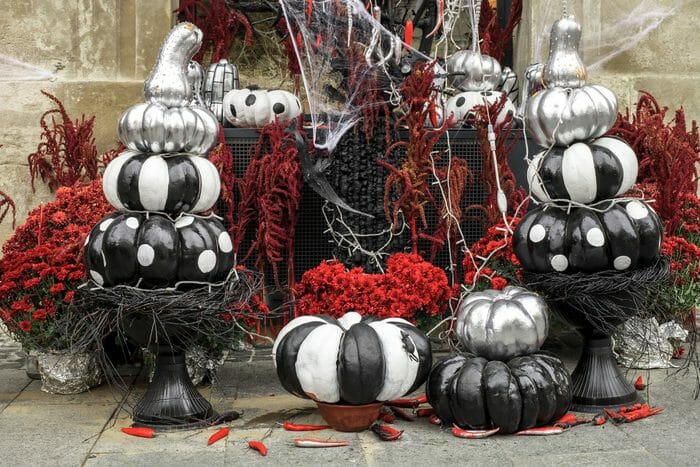
Painting patterns on pumpkins allows you to quickly and easily adorn a number of them while still making them visually appealing. You may pick from a variety of designs, such as polka dots, stripes, diamonds, and checks.
Stenciled Vampire Emoji Halloween Pumpkin Painting
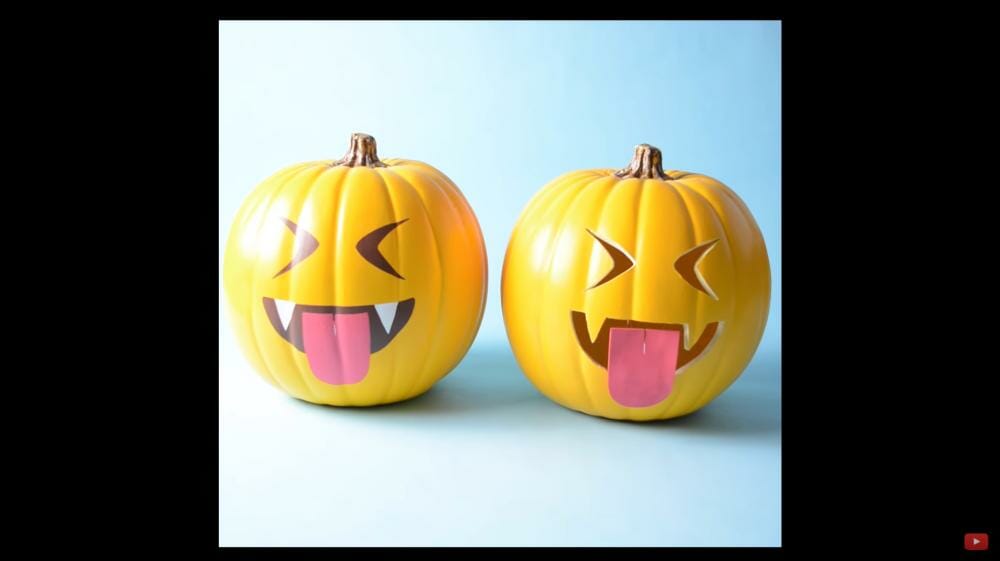
Even youngsters can complete this wonderful craft because it is so simple to do. The Plaid Crafts YouTube clip demonstrates how to easily make a stenciled vampire emoji pumpkin for Halloween that is more adorable than frightening.
A pumpkin, a two-way stencil, many colors of paint, three paintbrushes, a pencil, and a cutter are all necessary materials. If your neighborhood craft store doesn’t have all of these supplies, you may get them online. You don’t need to carve anything, so don’t worry.
On a piece of paper, begin by sketching the vampire emoji. To guarantee that you won’t make any errors, look up the templates online. Then you may adhere the paper to the two-way stencil, cut out the pattern over the spaces, and paint those areas (eyes and mouth).
Make careful to get the tongue and teeth perfect by checking the YouTube video because it can be a little tough when it comes to the mouth. The teeth must be drawn before the tongue and the rest of the mouth. Additionally, paint the teeth and tongue first while doing the components because it will be simpler afterwards. Remove the stencil after the painting is finished and appreciate your new creation.
There is no carving involved, as you may have noted. There is a carving variation, though. If so, you can carve the face features rather than painting them by using the stencil to outline their shape and then peeling it off. The tongue must also be constructed from a foam sheet, painted pink, and attached to the top of the mouth using pins.
Feeling Corny
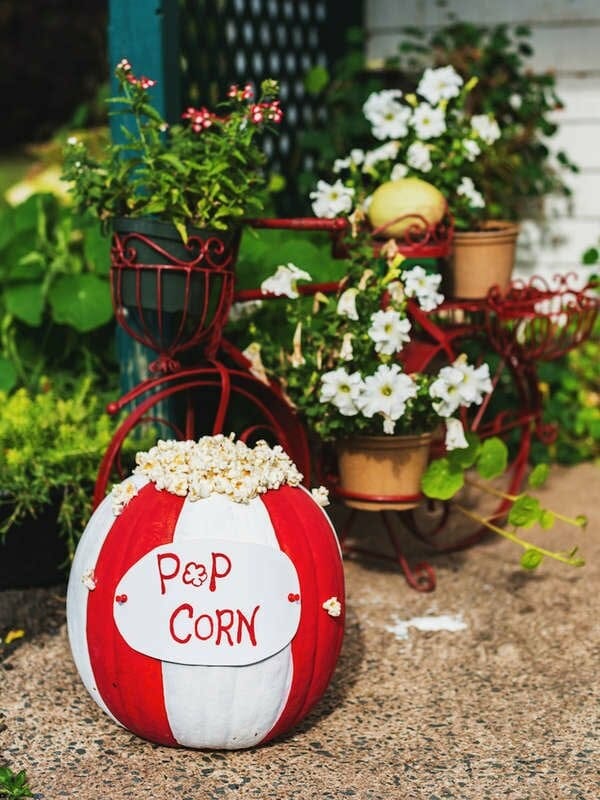
Your pumpkin will resemble a popcorn bucket if you paint it in strips of white and a vivid color alternately. For the overflowing snack, crumple up some white and yellow tissue paper and glue it on top.
DIY Leopard Print Pumpkin
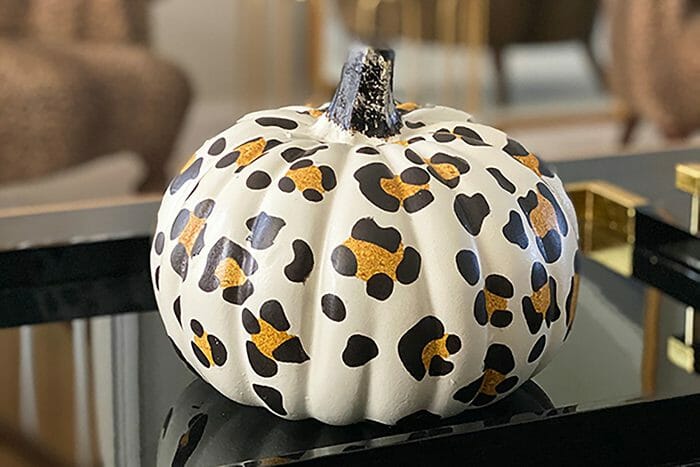
This Halloween, if the thought of freehand carving an entire pumpkin scares you away from trying, consider Authentically Emmie’s straightforward remedy: temporary tattoo paper. Print out the pattern you choose, cut out the shapes, and then cover the entire pumpkin with them.
As with applying a temporary tattoo to the flesh, after the design is done, rub a moist cloth over it until the back begins to peel off. Even a pattern file is available for download from blogger Emily Ho if you want to create the same thing.
Do you want to display your pumpkin outside? To make it weatherproof, Emily advises giving it a clear layer of Krylon acrylic spray paint. Here are several other methods to store a pumpkin.
Endless Smiles Halloween Painting Ideas
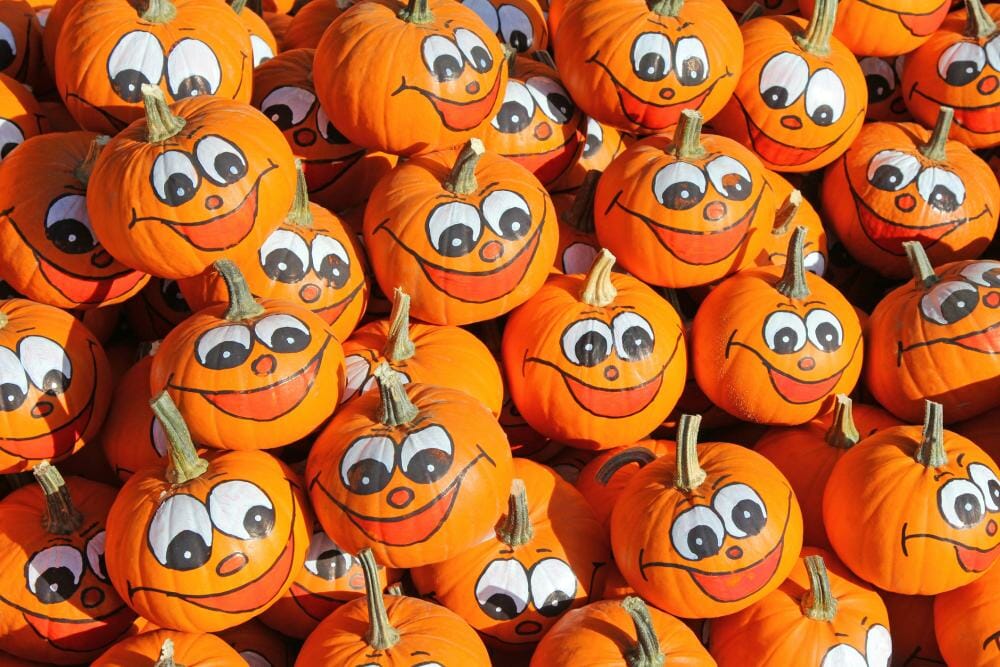
You may paint happy cartoon figures on pumpkins to brighten your entire home, making this a great Halloween painting idea for your kids. Make sure to spend some time and decorate as many pumpkins as you can since we enjoy the idea of many happy pumpkins, as seen in this picture.
The task is not too complicated. Drawing the outline of the face features before painting them is the most difficult step. Keep to the layout shown in this image if you are unsure about your sketching abilities. Alternately, you may utilize comparable photos that you find online to create themes.
You may use black paint and a thin paintbrush to paint the outlines after penciling them in. Then, using a different, somewhat thicker paintbrush, paint the white of the eyes, along with the pink of the nose and lips. We are confident that your kids will be enamored with this idea.
Float Around
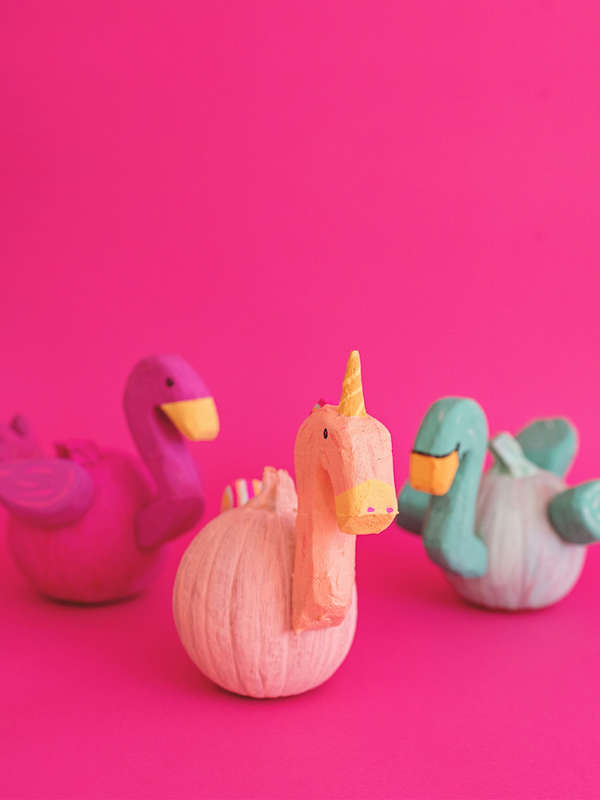
You might have to wait a little while for those hot summer days when you can relax on your unicorn pool float once more, but in the meanwhile, keep a little bit of summer with you with these pumpkin carving ideas. These inventive pool float pumpkins are made according to a step-by-step tutorial provided by A Subtle Revelry.
Bejeweled Pumpkins
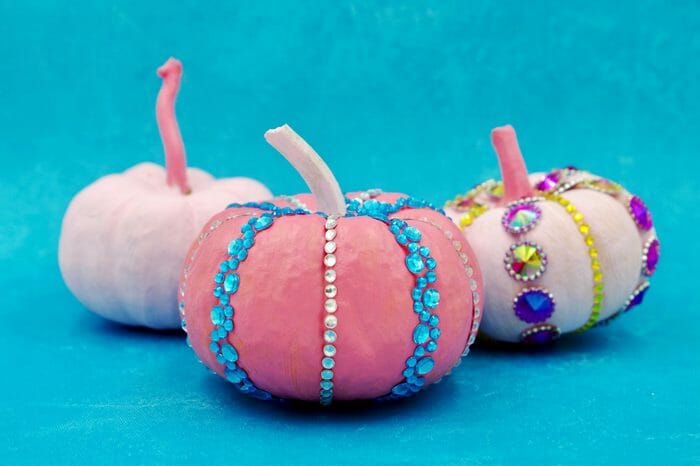
A jeweled pumpkin is the way to go if you still want to join in on the pumpkin decorating fun but want something a little more glitzy. It’s as simple as that: choose your favorite contrast color to paint the pumpkin and the stem, and then hot glue some imitation jewels down the ridges of the pumpkin.
Straight Face Pumpkin Painting Designs
For Halloween, not all pumpkins have to have spooky or happy faces. You can use a more impartial strategy by painting a straight face and sparse facial features. We believe that a lot of people appreciate this straightforward style since it complements an adult-oriented Halloween celebration.
Let’s say you want to utilize the image as an illustration. In that instance, you will want black and white paint as well as two different paintbrushes: one bigger one for painting the entire pumpkin white and one smaller, thinner one for drawing the face expressions.
Protect the surface from paint before beginning the painting project by applying some plastic coverings. Let the entire pumpkin dry after painting it with a coat of white paint, then add a second coat to get the solid color.
The delicate features of the face, such as the eyes, nose, and straight lips, can then be drawn by dipping the fine brush in black paint. You may do this to many pumpkins to make an ensemble and intensify the neutral effect.
Colorful Creations
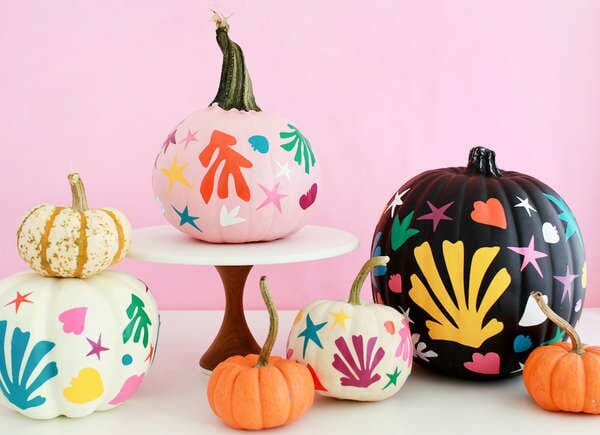
These lovely designs were inspired by the works of Henri Émile Benoît Matisse. And you don’t need to be a great artist to paint the various forms—Oh So Beautiful Paper created the effect by cutting out the shapes from vinyl paper using various templates!
Zigzag Pattern Painted Pumpkins
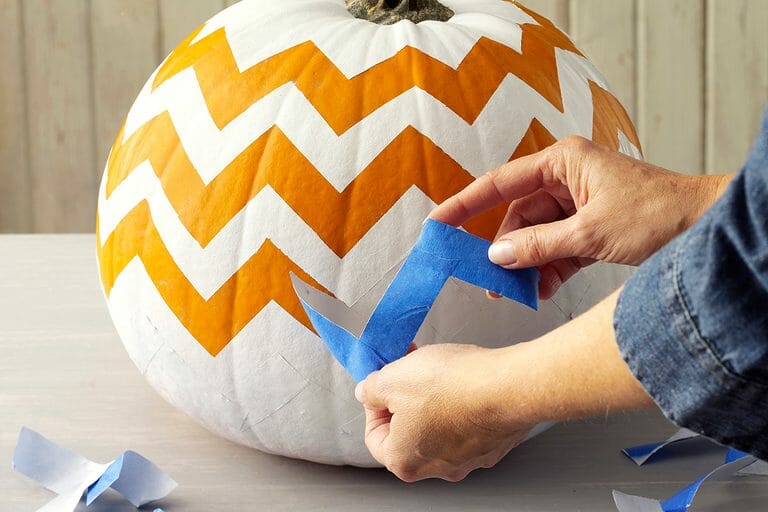
Mark the painter’s tape with your chosen chevron depth, then cut it off to create a chevron pumpkin. A typical pumpkin should be roughly 2 1/2 inches in diameter. To circle the pumpkin numerous times, cut enough strips.
Place a cut piece of tape at a 45-degree angle with the bottom corner meeting the center guideline and mark the pumpkin’s widest point with a pencil. Tape pieces should be placed all the way around the guideline, alternating between upward and downward angles, with the ends of the pieces overlapping.
Once the tape has completely encircled the pumpkin, create fresh lines and lay tape at intervals of approximately an inch above and below the center zigzag. Repeat as often as required to finish the chevron pattern. Spray paint the pumpkin with two coats while protecting the stem using painter’s tape. Remove the tape from the pumpkin while the paint is still wet and let the paint dry fully.
Black Spider Cute Pumpkin Painting Ideas
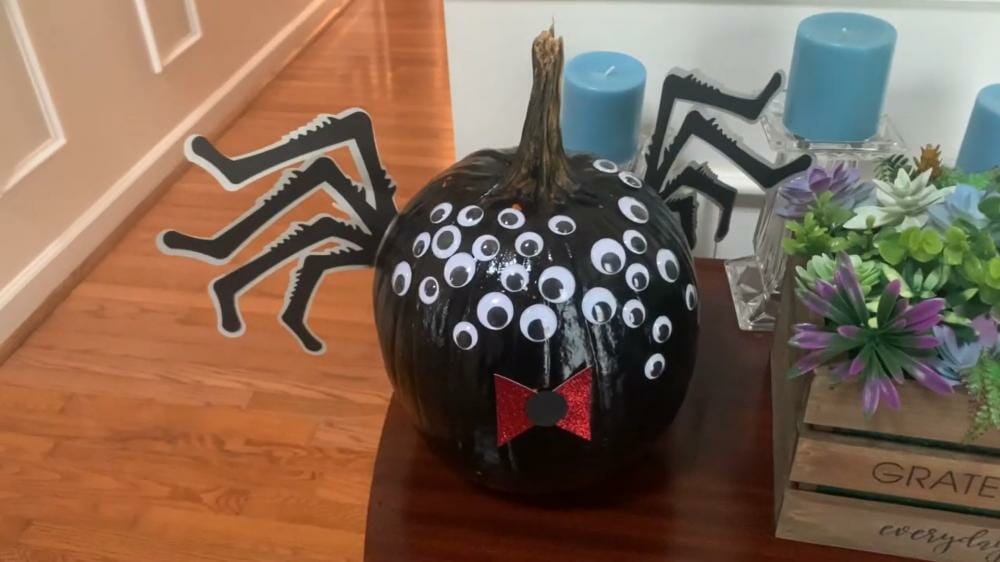
Watch this wonderful YouTube video instruction made by Camden’s Playhouse to learn how to convert a complete pumpkin into an awesome-looking black spider. Although it’s cute and doesn’t take much time, you’ll need some prosthetics.
First, obtain a big pumpkin. Since you’ll be using spray paint to convert it fully black, it doesn’t matter what color it is. Put some plastic coverings on the floor of your flat to shield it from paint, if you reside there.
You may concentrate on the spider’s legs after turning the pumpkin black. Drawing the form on cardboard and cutting it to suit the pumpkin is a simple technique to manufacture them.
However, you need cut two pieces of cardboard—one black and smaller, the other white and larger—for each leg. By adhering two pieces of cardboard together, it is intended to support the spider’s legs and strengthen them. Furthermore, it will be noticeable since the back of the legs are white.
Make two creases on either side of the pumpkin with a cutter to accommodate the legs. The legs may then be easily put into the crease by taping tiny plastic tubes to one end of each leg. When creating the creases and including the spider legs, take care to keep the overall appearance as symmetrical as feasible.
The remaining instructions simply call for you to decorate the pumpkin with several googly eyes and a mouth made from red cardboard. We have no doubt that you’ll like this adorable black spider.
